
Challenges of Winter Composting with Worms: How to Keep Your Bin Thriving When Temperatures Drop.
Learn what to do and when with this handy check list.
When winter rolls in, even the worms start shivering—okay, not really, but you get the idea.
For vermicomposters, the challenges of winter composting with worms can make you feel like you’re running a bug bed-and-breakfast during an ice storm.
Cold snaps mean sluggish worms, frozen bins, and heaps of unfinished scraps. If keeping your compost bin happy feels trickier than a snow day with no sled, you’re not alone.
Let’s break down what happens when temperatures drop and your wiggly crew faces the chill. This post looks at what can go wrong, why it matters for every die-hard composter, and how you can sidestep the most common hiccups.
Whether you’re a worm bin newbie or a wriggly veteran, you’ll leave ready to keep your worms cozy and productive until spring shows up.
Why Winter Challenges Worm Composters
Winter doesn’t just nip at your nose—it nips at your worm bin, too. As the mercury drops, so do the odds of your composting crew staying comfy and busy.
Chilly winds and cold snaps turn a thriving worm hotel into something closer to a wormy waiting room, where everything slows to a crawl.
Let’s dig into the cold, hard facts about why the challenges of winter composting with worms require extra care and creativity from every compost enthusiast.
Cold Temperatures Slow Everything Down
 Photo by Sippakorn Yamkasikorn
Worms aren’t big on snow days—they don’t even get the day off. When temperatures slide below their favorite range, things start to crawl—literally.
The ideal comfort zone for most composting worms (like red wigglers) sits at a cozy 15°C to 25°C (59°F to 77°F).
That’s when they munch through scraps, make compost, and multiply like nobody’s business.
But as temps dip below 10°C (50°F), worms tell you they’re cold by slowing down:
- Feeding drops: Scraps pile up because worms eat much less when chilly.
- Movement crawls: Don’t expect the usual wriggling parade. Worms hunker down, barely budging.
- Reproduction declines: Fewer worm eggs and baby worms, and those that hatch take forever to mature.
Below 4°C (about 39°F), you’re in the danger zone. Freezing temps can kill worms outright or damage their eggs.
So, leaving a bin outside without any protection is like camping in winter—without a tent, blanket, or marshmallows.
The challenges of winter composting with worms demand you find creative ways to keep those little workers warm.
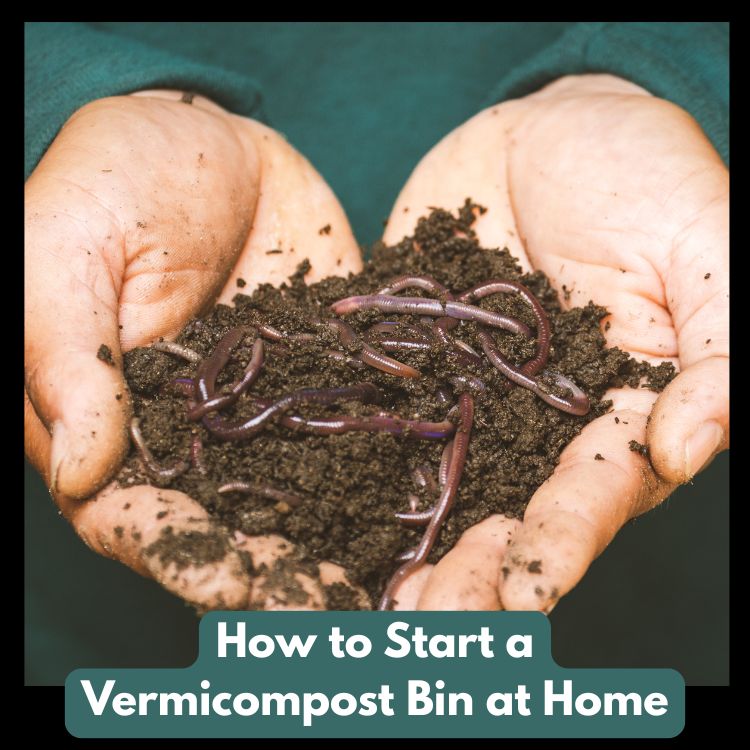
For tips on setting up your worm bin right from the start so you’re not scrambling when winter comes, check out how to start a vermicompost bin at home.
Worm Bin Survival in Freezing Conditions
When Old Man Winter grows grumpy, everyone in the worm bin suffers. Not just your worms—the microbes responsible for breaking down scraps also slow down or die off.
Things get risky fast if:
- The compost feels ice-cold or you see frost inside the bin.
- Worms clump together in a desperate, shivery ball (a classic sign of trouble).
- Food scraps stick around, barely touched for weeks.
If your bin freezes, worms can turn into worm-popsicles overnight. Eggs, which usually survive a bit longer, won’t hatch until spring—or sometimes not at all if the cold bite goes too deep.
Your friendly microbes also go dormant or die, which halts composting. The bin becomes a pile of old food instead of a wriggly ecosystem.
Worms can sometimes survive in the center of a big, dense, insulated bin, using the mass and microbial heat as a buffer.
But most home-scale bins need insulation, covers, or even a move indoors to avoid winter losses.
Moisture Mayhem: Keeping the Balance
Winter isn’t just cold. It’s also unpredictable when it comes to moisture. Cold air fires up the home heater, drying things out.
Outdoor bins might get soggy if melting snow or rain sneaks in.
Here’s where moisture turns mayhem:
- Too dry: Bedding crumbles, worms dry out, and composting slows.
- Too wet: Waterlogged bins suffocate worms and breed smelly conditions.
Aim for bedding that feels like a wrung-out sponge—damp but not dripping. Check weekly through winter because conditions change fast.
If your bin sits outside, keep it covered to block rain and snow. If it’s inside, watch for dry patches, especially if the heater is running.
Quick tips to balance moisture in winter:
- Add dry bedding if things look swampy.
- Sprinkle water if the mix gets dusty.
- Use thick bedding layers to help buffer against wild swings in humidity.
Getting the moisture right is essential for keeping your worms happy—no one wants to see their compost crew sluggish or stressed all winter long.
For more ideas on setting up a winter-ready bin that keeps moisture balanced, revisit how to start a vermicompost bin at home.
You’ll find practical tips for bedding choices and bin design that pay off when the weather gets wild.
Funky Odors, Pests, and Other Winter Surprises
Winter composting isn’t just about chilly worms and slower scraps. As temperatures drop, new problems show up—foul smells, tiny pests, and an unexpected rush of slimy surprises.
Bin care might feel like running a quirky science experiment with nature’s weirdest problems. The cold slows everything down, making piles stinkier and sometimes attracting bugs you thought had packed up for the season.
But don’t worry, spotting trouble early and knowing a few quick fixes will keep things under control even when winter throws its weirdest curveballs your way.
 Photo by Efrem Efre
When Things Get Stinky: Causes and Fixes
No one signs up for a worm bin hoping for a punch in the nose every time they lift the lid.
But in winter, the challenges of winter composting with worms can bring about some of the stinkiest conditions. Why does this happen?
The cold slows worm activity and microbial action. Scraps pile up, break down slower, and before you know it—hello, rotten egg smell.
Here’s why winter turns bins into stink headquarters:
- Slow breakdown: Chilly worms munch less, and beneficial bacteria go on winter break. Food sits, rots, and starts to reek.
- Too much moisture: Cold weather means less evaporation. If bedding gets soggy, scraps turn to sludge, and that’s a recipe for nasty smells.
- Overfeeding: It’s tempting to toss all your holiday leftovers in, but worms can’t keep up when they’re cold. Leftovers get smelly fast.
To keep winter stink at bay, try these simple strategies:
- Keep the lid slightly ajar or add air holes to boost airflow. Stinky bins often mean not enough oxygen.
- Bury food scraps deeper under the bedding so worms can get to them first. Try chopping food smaller for even faster processing.
- Add extra dry bedding (like shredded cardboard or newspaper) to soak up excess moisture.
- Cut back on feeding: Only add scraps when the last batch has mostly disappeared.
A bin should smell earthy—like a damp forest floor. If it smells like rotten eggs, onions, or ammonia, it’s time for a little rescue mission.
Quick action means your composting crew gets back to work with fewer complaints from your nose.
Unwanted Guests: Dealing with Winter Bin Pests
Just when you think freezing weather would keep pests away, surprise! Some bugs see your cozy worm bin as the best winter getaway in town.
Fruit flies, fungus gnats, and even the occasional springtail or mite can sneak in when the bin gets too wet, too rich, or too warm on the inside.
Common winter pests and why they show up:
- Fruit flies & fungus gnats: Love it when food is exposed and bedding is soggy. Slow winter breakdown means more leftovers for them.
- Mites and springtails: Usually harmless, but in huge numbers, they compete with worms for food and crowd the bin.
- Ants: Sometimes sneak inside if the bin stays warmer than the outside ground.
You can fight back with some easy habits:
- Always bury food scraps well under new bedding to hide scents from flying invaders.
- Use a tight-fitting lid and place a piece of breathable fabric or newspaper inside the bin to catch flies.
- Sprinkle a bit of crushed eggshell or agricultural lime on the surface to make it less friendly for bugs.
- Remove any standing water from underneath the bin tray—moist, stagnant spots attract critters.
If a pest takes over, scoop out heavily-infested bedding and add fresh, dry bedding. Sometimes a short break from feeding helps, too.
A healthy, well-managed bin rarely needs drastic bug control.
If you want a refresher on how to set up your worm bin for fewer pest invasions and smoother composting all year, including winter, take a look at how to start a vermicompost bin at home.
The right foundation keeps most pests away before cold weather causes trouble.
Cold weather may slow your worms, but that doesn’t mean you have to accept a stinky, bug-infested bin.
With a few simple tweaks and an eye for early warning signs, your compost crew will stay productive and much less quirky—even in the deepest freeze.
Smart Strategies for Cozy Worm Bins
Worms are the original homebodies, especially when winter bites. If you want your composting crew to keep chomping away rather than hibernating, location, warmth, and smarter routines matter more than ever.
Creating a cozy winter home for your worms isn’t just about tossing another blanket on top. It’s about clever choices—think like a worm and build a mini worm chalet they won’t want to leave.
Here are some battle-tested, fun tips for keeping your wiggly composting heroes happy, productive, and far from frozen this winter.
Location, Location, Location: Where to Place Your Bin
The old real estate advice is true for worms too. The right spot makes all the difference when facing the challenges of winter composting with worms.
- Garage: A top pick for many worm wranglers. There’s shelter from the wind, but it usually stays cooler than inside the house. Make sure your bin isn’t up against drafty doors or icy floors.
- Basement: Steady temperatures and low light make basements a wormy paradise. Just beware of forgetfulness—out of sight shouldn’t mean out of mind!
- Utility or mudroom: These semi-warm, lightly used spots work well. Worm bins here get the benefits of indoor warmth without crowding your main living space.
- Outdoors? Only if you can insulate well (more on that in a minute). If you have no indoor space, place the bin against a sheltered wall out of the direct wind, or tuck it under a deck. Sun on the bin in the day helps, but be sure to protect from cold snaps at night.
Insider tip: Lift the worm bin off the ground with a crate or bricks if it’s outside. Cold creeps up from below faster than you’d expect.
For added warmth, some composters use an old rug or mat underneath.
Don’t have indoor space? You can still compost outdoors even in winter, as long as you think ahead and stack the odds—and bedding—on your worms’ side.
For practical setup ideas, check out how to start a vermicompost bin at home for bin placement hacks that work in all seasons.
Worm Bin Insulation: DIY and Upcycled Solutions
When temperatures plummet, your bin needs a winter coat. Store-bought insulation works, but upcycled and DIY tricks can save money and add fun.
Some popular worm bin insulation ideas include:
- Thick bedding: Start by doubling up bedding layers with shredded cardboard, straw, or dry leaves. It acts as a thermal blanket and keeps moisture balanced.
- Old blankets or duvets: Wrap your bin like a burrito. Just keep fabric dry to prevent mold.
- Styrofoam or packaging material: Line the outside of your bin or construct a mini “igloo” for your worms using large foam boxes.
- Bubble wrap: Fast, cheap, and surprisingly good at trapping warmth when wrapped around bins.
If you’re feeling crafty, try stacking straw bales around the bin or slipping it into a big plastic storage tote stuffed with shredded newspapers.
The more layers between worms and cold, the better their chances.
A few common-sense pointers:
- Don’t seal the bin airtight—worms need air.
- Dry insulation is key; wet blankets make things colder.
- Insulate the lid, sides, and bottom for best results.
Warming Up: Heaters, Mats, and Other Tools
On the coldest nights, even insulation might not be enough. Sometimes you need to turn up the heat (safely, of course).
The best tools for warming a worm bin include:
- Seed-starting heat mats: Place under, not inside, your bin for gentle low-level heat. Great for maintaining temps above freezing, but don’t cook your worms—set mats to low or use a thermostat.
- Ceramic heat lamps: Suspend above outdoor bins to add warmth. Use a timer and never let bulbs touch bedding or plastic.
- Bottles of hot water: A low-tech, low-risk option. Tuck securely in the bin (outside the bedding area) and swap as they cool.
- Reptile tank heaters: For diehard composters, these offer controlled, adjustable heating. Watch for overheating!
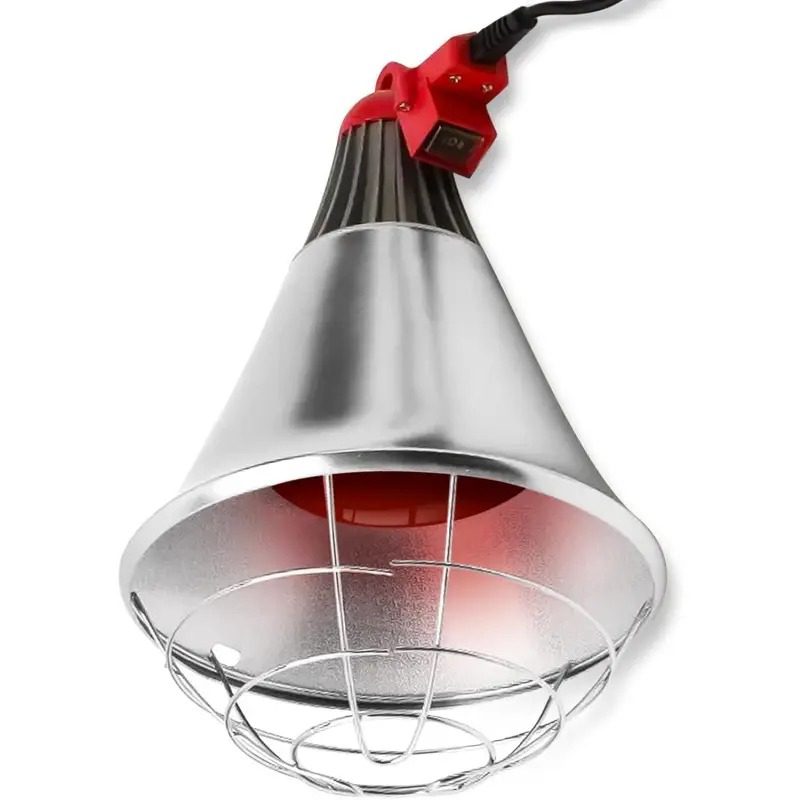
A few rules of thumb:
- Aim for a worm-zone temp of 10°C to 20°C (50–68°F).
- Never use fuel-burning heaters—they release toxic gases.
- Don’t mix water and plug-in electrical devices without GFCI plugs or safety checks.
Warming adds complexity, but if you want worms working year-round, these tools make a difference.
Remember to monitor bin temps with a compost thermometer, and make changes gradually.
Feeding in Winter: Less is More
Winter slows everything down—including worms’ appetites. The last thing your chilly crew needs is a buffet they can’t finish.
- Feed smaller amounts: Offer food scraps only when most of the last batch is gone. Overfeeding creates smelly, soggy conditions that no worm enjoys.
- Pay attention to food type: Easy-to-eat scraps like mashed veggies, bits of fruit, and coffee grounds are worm favorites in cold months. Avoid mountains of citrus, onion, dairy, or meat.
- Chop or blend food: Smaller sizes break down quicker and produce less gas as they decompose.
One trick many winter composters swear by: pre-freeze or microwave scraps and let them cool to room temperature before adding.
This not only softens the food but can kickstart decomposition, making meals easier for slow-moving worms.
If you’re new to the feeding dance and want to nail the basics, here’s an essential guide on how to start a vermicompost bin at home—perfect for building solid routines from day one.
Keeping your worms comfortable in winter is part science, part art, and a little bit of empathetic guesswork.
A few tweaks to your bin’s location, insulation, and feeding habits will keep your composting crew healthy, happy, and ready to wriggle through even the coldest months.
Troubleshooting Your Winter Worm Bin Like a Pro
When the cold hits, worms aren’t the only ones ready to hunker down. Everything slows, weird things pop up, and suddenly, your worm bin feels less like a mini-ecosystem and more like a winter science project gone sideways.
The good news? Most hiccups in winter composting have quick fixes if you know what to look for.
Here’s how to spot issues, recover from winter surprises, and keep your composting groove going strong.

Help! My Worms Aren’t Moving: Diagnose Sluggish Worms and Offer Quick Checks
Worms love to wriggle. So it’s easy to panic if you peek in and find them in slow-mo.
Before you write your bin off as a lost cause, check a few key things:
- Warmth: Is your bin above 10°C (50°F)? Colder bins slow down worms—sometimes they barely move when it’s chilly.
- Moisture: Bedding should feel like a wrung-out sponge. Dried out? Add water and moist bedding. Too soggy? Mix in dry newspaper or cardboard.
- Food: Did you overfeed and scraps are rotting untouched? Or maybe you underfed and they’re low on snacks?
Simple steps to pep up sluggish worms:
- Take their temperature. Use a compost thermometer or stick your hand in. If it feels fridge-cold, move the bin to a warmer spot or add insulation.
- Check moisture. Too dry? Mist bedding. Too wet? Fluff up with extra dry bedding.
- Adjust their diet. Only feed again when most scraps disappear. Smaller chopped bits break down fastest in winter.
- Layer up bedding. More bedding equals better insulation and steadier temps.
If you want to start your bin off right, or troubleshoot setup issues that cause winter slowdowns, check out how to start a vermicompost bin at home.
Dealing with Frozen Nightmares: What to Do if Your Bin Freezes
 Photo by Erik Mclean
Waking up to a frozen bin? Don’t panic—the “challenges of winter composting with worms” means it happens to even seasoned composters.
Worms and cocoons may survive if you act quickly.
Immediate steps to minimize losses:
- Move the bin indoors or to a sheltered location right away (garage, basement, porch).
- Let the bin thaw naturally. Don’t use boiling water or a space heater—sudden warmth can shock worms or burst their fragile bodies.
- Open the lid and check for survivors in the center. Sometimes, worms cluster here where it’s warmest.
- Gently fluff the bedding as it thaws to boost airflow.
- Wait before feeding. Give worms time to recover and let beneficial microbes bounce back.
- Remove truly dead worms to avoid bad smells, but give sluggish ones a chance—they sometimes revive after thawing.
For next time, plan ahead:
- Insulate your bin before big cold snaps. Thick dry bedding or wrapping the bin helps.
- Place bins near heat sources (but not directly on them) for steady warmth.
- If you must keep your bin outside, tuck it next to a wall that gets winter sun or under cover.
Preventing Winter Burnout: Keeping Up Your Composting Mojo
It’s normal to hit a winter slump with your worm bin.
Short days, cold hands, and limited outdoor time can sap your composting spirit. But don’t quit before spring!
Ways to keep your energy up and composting on-track:
- Make it a ritual. Check your bin during morning coffee or after feeding pets. Routine keeps things from slipping.
- Track your wins. Note how much food waste you save weekly. Celebrate the worms’ hard work.
- Try new bedding or food types. Survive the boredom by experimenting with chopped oats, shredded cardboard, or even leftover pumpkin.
- Connect with other worm fans. Swap winter survival tips online or share photos of your bin’s silliest moments.
- Remember your why. You’re saving food from landfill and creating the best soil booster around!
- Set a spring goal. Plan a garden bed, window box, or potted plant to feed with your first spring worm compost.
Even if you face the most stubborn “challenges of winter composting with worms,” you’re in good company—and every small fix brings greener days closer.
Conclusion
Facing the challenges of winter composting with worms might sound daunting, but it’s just another chapter in the worm bin adventure.
Your composting crew can thrive even as frost creeps in, with a few smart tweaks and attention to warmth, moisture, and feeding routines.
Remember, a cozy bin means happy worms—and happy worms mean rich compost come spring.
Winter composting rewards creativity and patience.
Stick with it, and your worm bin will prove surprisingly resilient.
Curious about building or tweaking your setup to handle any season? Peek at the guide on how to start a vermicompost bin at home for more inspiration and time-tested advice.
Thanks for wriggling along to the end. Share your chilly weather worm wins (and fails!) in the comments.
With a playful spirit and a bit of effort, winter composting with worms can be both fun and fruitful!